Tools
This course uses a bunch of tools for data science and big data with Python, that can cause hassles to install directly on a machine. Therefore, we built a Docker image for the course which makes things much easier. The main tools available in this image are :
The image provides also extra things, such as the Polynote notebook and Scala that we won’t use (but useful if you want to learn/use these) and Dask, which provides an alternative to Spark that we’ll only explore very quickly, since the course is focused on Spark.
It is mandatory to use this image. We won’t help to install anything on your laptop.
The docker technology is an industrial standard and should work in almost all possible reasonable configurations.
Installation of the Docker image of the course
-
Download, install and launch
dockeron your laptop at https://www.docker.com/get-started -
Create an account on docker hub (if you don’t have one already) at https://hub.docker.com
-
Open a terminal (
powershellon windows) and typedocker loginand provide the username and password you use in https://hub.docker.com
-
Type the command
docker pull stephanegaiffas/big_data_course:v2that will download the image we will use for the course. This might take some time as the image weights almost
3GB -
The image has been downloaded and appears when typing
docker image ls
-
Let’s run this image now, namely let’s create a container based on it. This is easily achieved using the
docker-composecommand. This command reads the contents of theYAMLfile calleddocker-compose.ymlto understand howdockercan create a container based on the image. First, open your favorite text editor to create a file nameddocker-compose.yml, and copy-paste this:version: "3.7" services: big_data_course: container_name: big_data_course image: stephanegaiffas/big_data_course:v2 ports: - "8192:8192" - "8888:8888" - "4040:4040" restart: always volumes: - "/Users/stephanegaiffas/Code/big_data_course/:/opt/polynote/notebooks/" restart: always environment: - PYSPARK_ALLOW_INSECURE_GATEWAY=1The only thing to modify in this file is the path
/Users/stephanegaiffas/Code/big_data_courseindicated in thevolumessection of the file. You just need to replace it by the path you want to use on your laptop, namely"PATH:/opt/polynote/notebooks/"wherePATHis the path you want to use. Do not modify anything else in this line, in particular do not change the:/opt/polynote/notebooks/path, and do NOT leave a space before the:symbol. You can add several such paths if it pleases you. Once you’ve finished to modifydocker-compose.yml, save it and close it. -
Now, type in your terminal:
docker-compose upIn the terminal are printed a bunch of things, saying that inside the container,
jupyterandpolynoteare running among other things. -
You can open another terminal (and close the previous one if you want) and type
docker container ls
which says that a container named
big_data_courseis running. You can now access this container in several ways described below.
Some explanations
The docker-compose up command that we used before reads the docker-compose.yml file in order to understand what it has to do to “up” the required services. This file explains to Docker that it has to run a service (a synonym for container) called big_data_course with the following informations:
- the name of the container to create is
big_data_course - the image to use is
stephanegaiffas/big_data_course:v2(the one you pulled before, note thatDockerwould have pulled it automatically if it was not already there) - there are some ports to map
- and a volume to map
- and there is an environment variable to define
Actually, we could have not used the docker-compose.yml file and type directly the following command to run directly the image:
$ docker run \
   --name big_data_course \
   -it --rm \
   -p 8888:8888 \
   -p 8192:8192 \
   -p 4040:4040 \
   -e PYSPARK_ALLOW_INSECURE_GATEWAY=1 \
   -v /Users/stephanegaiffas/Code/big_data_course/:/opt/polynote/notebooks/ \
   stephanegaiffas/big_data_course:v2
which is equivalent to what is described in docker-compose.yml.
The options in this command line mean the following:
--name: we give the namebig_data_courseto the container (but we can give any other name)-it: we run in interactive and terminal mode (allowing to see in the terminal thestdoutof the container)--rm: we remove the container after exit. If you want a persistent container, remove the--rmtag-p: we map the ports 8888 and 4040 of the container to the ports 8888 and 4040 of the host machine (your laptop). If you are using already one of these ports an error is raised. You can change the port if you want, for instance-p 7777:8888means that port7777on your laptop is mapped to the port8888in the container.e: we need to set an environmental variablePYSPARK_ALLOW_INSECURE_GATEWAYforSparkv: we need to mount a local volume (on the file system of your laptop) to a directory in the linux file system running in the container. Once again the option is-v LOCAL_PATH:CONTAINER_PATH. If we don’t do this, then the container has no access to the file system of the host and conversely, so that any file created or modified in the container would die with it. You can mount more directories if it pleases you.
Let us now explain all the things you can do/use with a container based on this image.
Access the Jupyter notebook
When the container is running locally you can access the Jupyter notebook from any web-browser using the link
This will show a password page

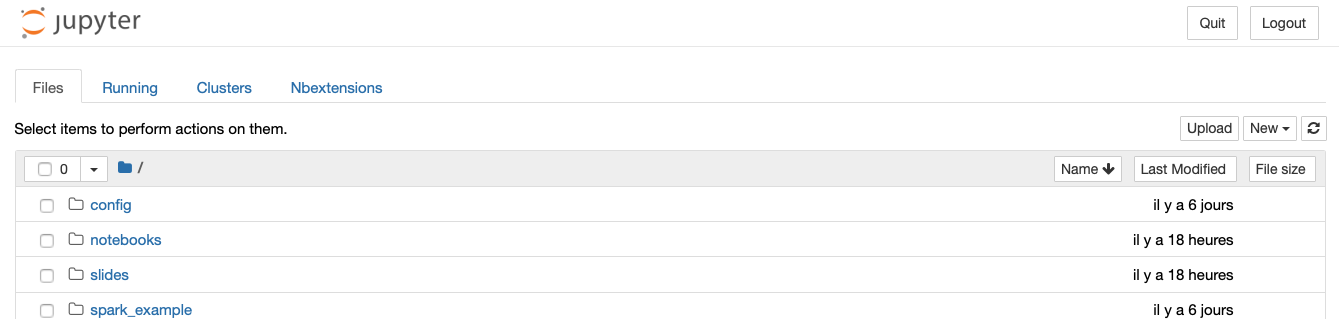
The password is abcdef. It’s useless to try and change it since you run Jupyter locally on your machine and not on a server. Then, you’ll end up with the jupyter home, showing the files in the PATH you specified in the docker-compose.yml file. Namely, you should see something like this :
Now, you can work !
Access a terminal with bash
If your container is named big_data_course this is done simply by typing
docker-compose exec big_data_course bash
which simply tells to execute bash in the container in interactive and terminal mode.
Run a Spark job using spark-submit
While we will mainly use pyspark in the jupyter notebook, we can also use the spark-submit command to launch a spark job.
Note that for large jobs, it’s usually done this way.
docker-compose exec big_data_course bash
cd setup_files
spark-submit SimpleApp.py
This opens a terminal in the container, go to a folder containing the python script SimpleApp.py and runs it with spark-submit. You should see something starting like this:

and you should see at some point something like this:
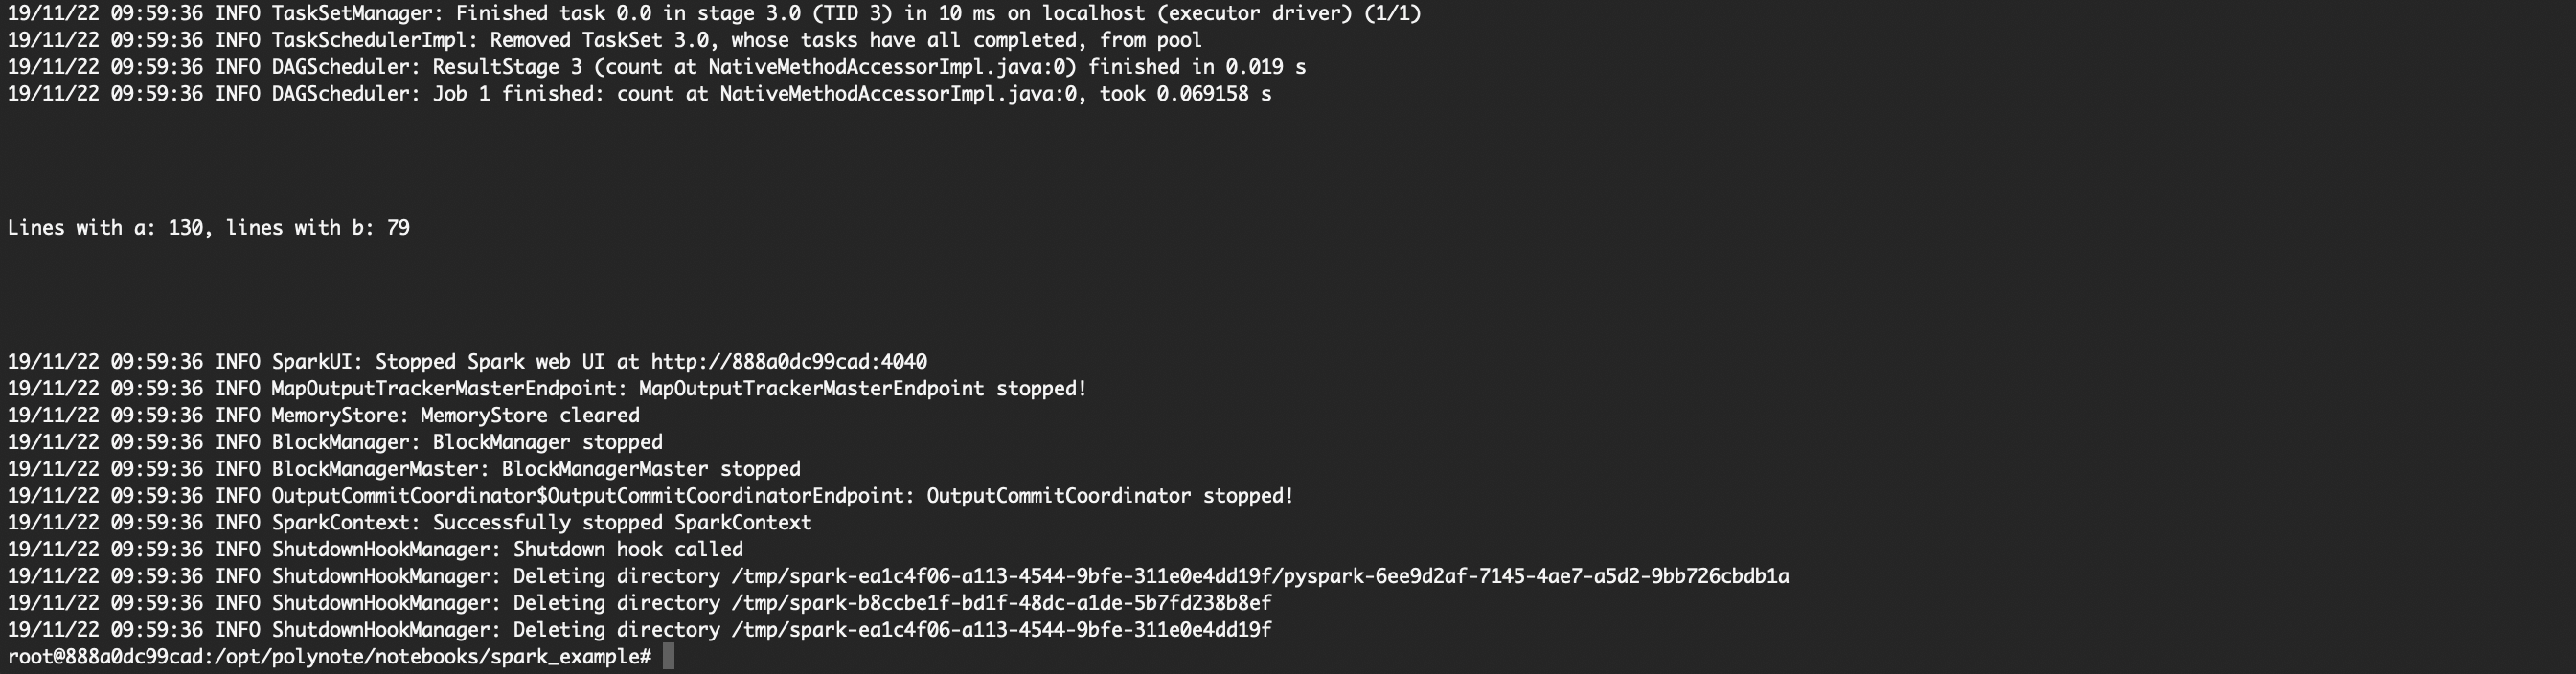
The line Lines with a: ... is the output of this Spark job. To understand what it’s doing, let’s have a look at the SimpleApp.py script:
from pyspark.sql import SparkSession

logFile = "requirements.txt"  # Should be some file on your system
spark = SparkSession.builder.appName("SimpleApp").getOrCreate()
logData = spark.read.text(logFile).cache()

numAs = logData.filter(logData.value.contains('a')).count()
numBs = logData.filter(logData.value.contains('b')).count()

print("\n\n\n\nLines with a: %i, lines with b: %i\n\n\n\n" % (numAs, numBs))

spark.stop()
It turns out that this Spark job is simply counting the number of lines in the requirements.txt file containing the letter a and the letter b.
Access Polynote
You can also use the Polynote notebook, which is a very recent project from NetFlix which provides an alternative to Jupyter, and is particularly interesting for Scala code. We won’t be using it in the course, but it’s nice to have access to it easily if you want to learn more about Scala (we’ll do only Python during this course).
You can access it from a Chrome web-browser using the link
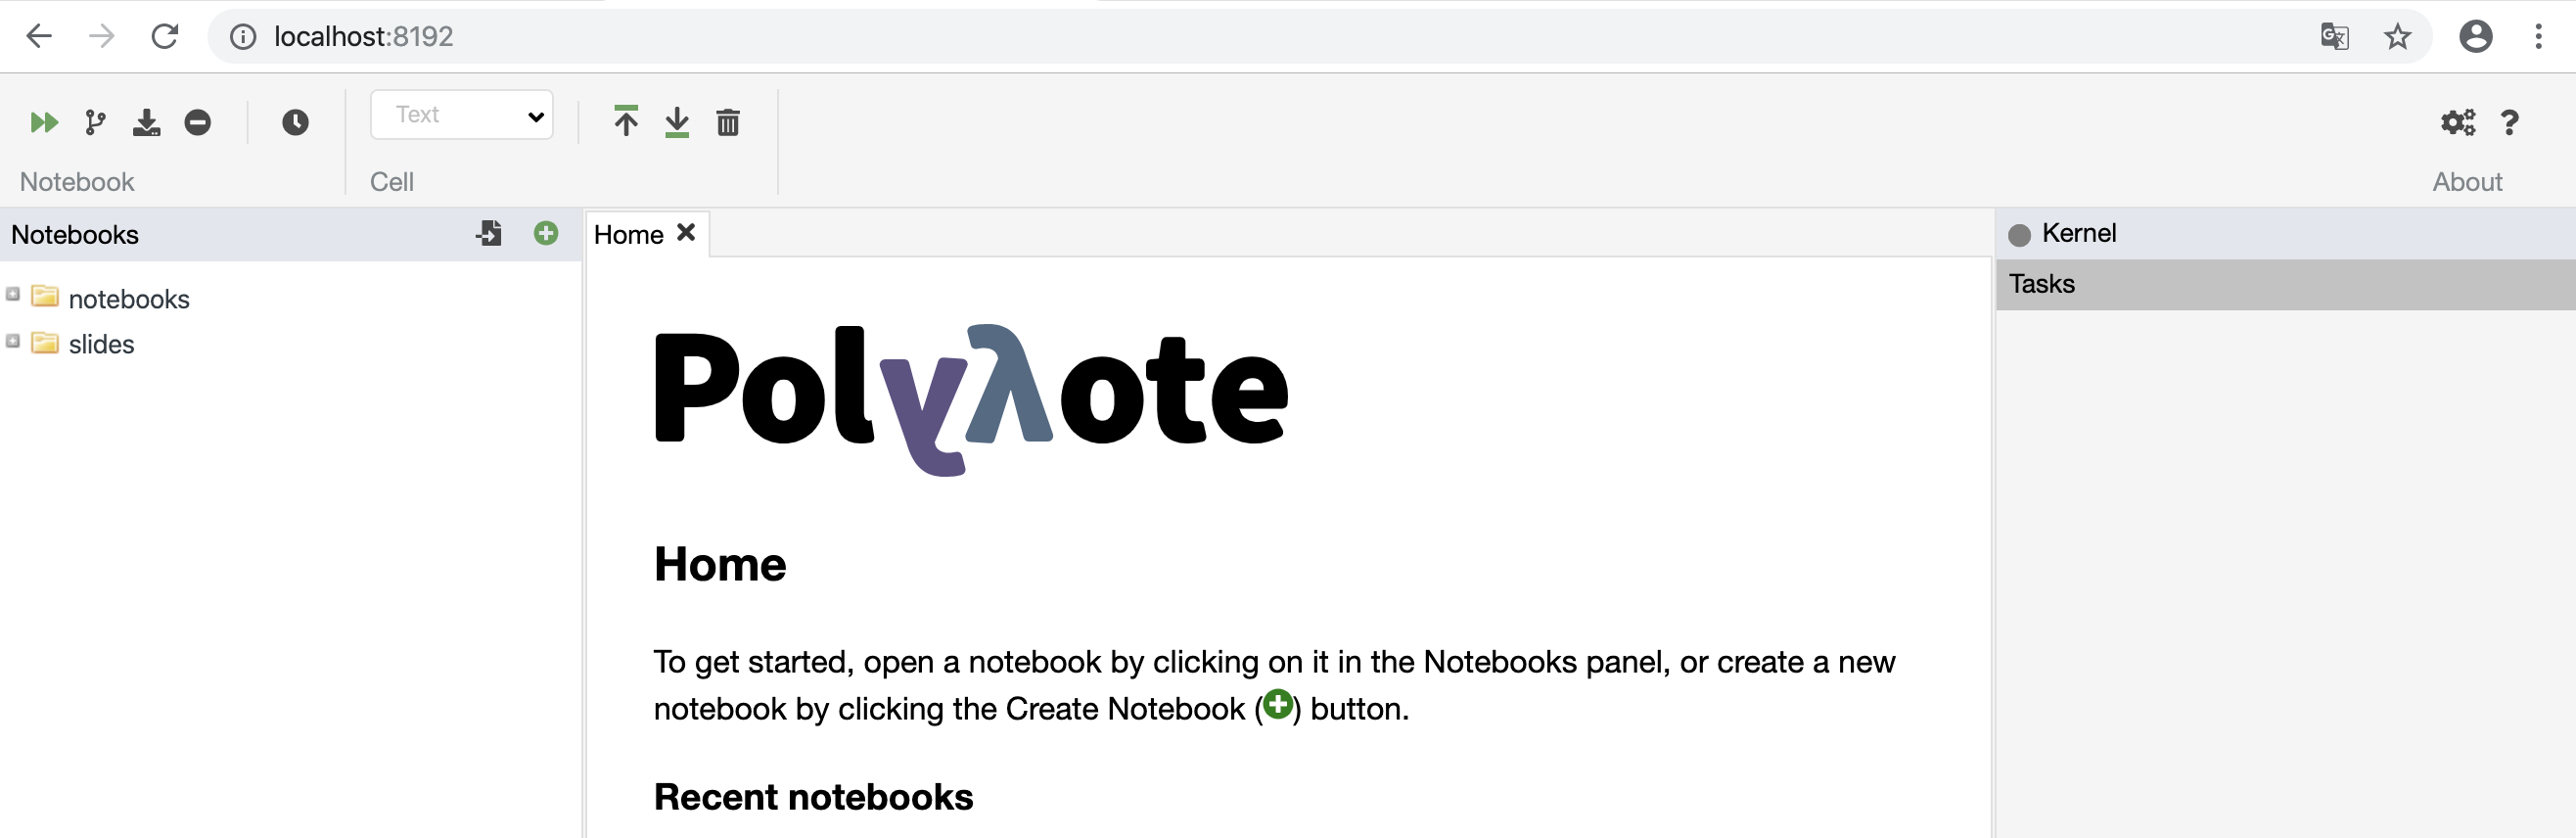
It’s pretty young, so it only works with Chrome for now.
The main docker commands
You might need to run, stop, rm, ls containers or images, so here are the most useful commands. Ideally, have a look at the docker tutorial here:
A list of the main commands is as follows:
docker-compose down: stops all the containers created bydocker-compose updocker container ls: list containersdocker image ls: list imagesdocker container stop id: stop the running containeriddocker container rm id: remove containeriddocker image rm id: remove imageiddocker image prune: remove all unused imagesdocker container prune: remove all stopped containersdocker pull: download an image
Use docker container ls -a and docker image ls -a to see all containers and images. This is useful if you want to do some cleaning, when docker uses a lot of memory or disk space you might want to remove containers and images that are not used, using rm or prune.